Tuesday 30 November 2010

Tuesday 23 November 2010

PACKAGING PDF'S

On looking at my net pdfs again, I realize that in retrospect it would have been a much more economical (and environmentally friendly) to arrange the designs on one pdf if possible. They could potentially all fit on one A1 format print.

BOARD ERRORS!

I've been conducting my final pre-module hand in check, and I can't believe it... after printing my boards for the 3rd time (since the first attempt on Friday) I have found yet another error! 
 (1)
The first error is "Distribution : (blank!)" on my first packaging board. This has annoyed me beyond belief. 

(2)
This error is not a typo but more a discovery. I was unsatisfied with my rsearch into the most effective/standard way of printing these life sized cut outs, and after some further research I have actually found that the spec would read :

"Dimensions : 24" x 72"
Stock : Foamboard
Print processes : Digital UV printing directly onto foamboard
Finishing : Computer aided cutting process - router cutting
Cost : £48 per board
Assembly : On shop floor
Stand : Included in cost"

This is something that I had not finalized until last night. Although my initial spec on my board is not wrong, I would really like to update it to this more specific and accurate one. I have made to the alterations to my file and I am going to try and re-print this this morning.

END OF MODULE SELF EVALUATION


BA (Hons.) GRAPHIC DESIGN
LEVEL
05
Module Code
OUGD201
Module Title
'What is god?'
END OF MODULE SELF-EVALUATION
NAME
Polly Williams
BLOG. ADDRESS  
http://pa-williams0912.blogspot.com/


1. What skills have you developed through this module and how effectively do you think you have applied them?

Throughout this module I have considerably developed my software skills. Due to the length of the project I have allowed myself to experiment with the programs, particularly InDesign and Photoshop, where normally I would have avoided for feeling worried that I would not have been able to achieve good results. After spending hours and hours working with it I feel far more competent and now fee like it really will aid my future work. I also feel that my research skills have developed; I think having such a long brief allowed me to become more thorough with my research and ask more questions.

2. What approaches to/methods of research have you developed and how have they informed your design development process?

I think my research has been a lot more thorough this module, and a lot more broad. Being more open minded has allowed me to be more adventurous with my designs.

3. What strengths can you identify in your work and how have/will you capitalise on these?

I feel I have developed a good understanding of the industrial print process from my independent research and now feel fairly confident with preparing a document for print, and designing it with this in mind. I also feel that from a combination of the typography workshops and my hours of battling with InDesign, I feel that my understanding and ability to produce better layout has improved to the point where I feel it's and are that I want to experiment with more. I think that the strongest elements of this project were my boards and magazine layouts. I have also become much more capable with photoshop, for example the shop window display. I'd like to work with it more in the future, particularly with image, pattern and illustrative type.

4. What weaknesses can you identify in your work and how will you address these more fully?

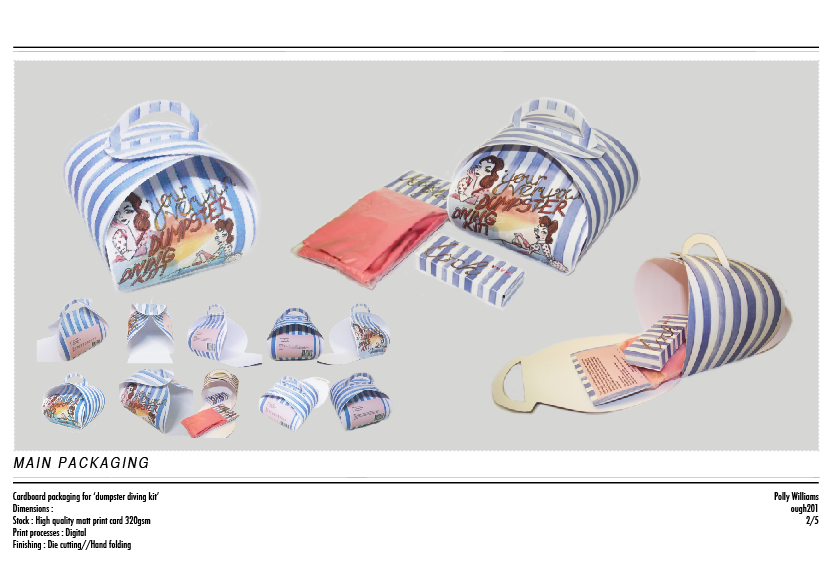
In my opinion, the main weaknesses in my work this module were some of my design descisions; from being ill for only a matter of days I hastilly made descisions about the design of my packaging that I now see fault in. I designed the artwork before finalizing what net I wanted to use, rather than designing with that in mind. I also feel that I rushed the packaging of the torch and the gloves. In hindsight I think that I had enough time to think these elements through more carefully. I feel that I stepped into my comfort zone in terms of the style of the artwork because I was ill and I panicked about not having enough time. I don't think I investigated a wide enough variety of stock possiblities; I found the most appropriate stock for what I had designed, but in the future I think I should have explored a range of stocks before starting the design process.

5. Identify five things that you will do differently next time and what do you expect to gain from doing these?

1)Explore a broader range of stocks earlier on in the design process.
2)Design throughout the entirety of the project, rather than starting halfway through.
3)Explore a broader range of packaging solutions before making descisions.
4)Be more adventurous with the term 'packaging' - it doesn't mean 'nets'.
5)Don't make irational descisions based on fear; the possibilites are almost endless if you manage your time well and use what you have to its full potential.

6.How would you grade yourself on the following areas:
5= excellent, 4 = very good, 3 = good, 2 = average, 1 = poor

Attendance 5
Punctuality   5
Motivation   5
Commitment  5
Quantity of work produced 4
Quality of work produced 3
Contribution to the group 3

Monday 22 November 2010

PROMOTIONAL MAGAZINE LAYOUT PDF FOR PRINT


Open publication


Dimensions : 235mm X 297mm

Stock : Newsprint

Print processes : Offset Lithography
(High volume printed but not for repeated publication)

FEATURE ARTICLE PDF FOR PRINT


Open publication


Specification for printers based on my research...

Dimensions : 235mm X 297mm

Stock : Newsprint

Print processes : Offset Lithography
(High volume printed but not for repeated publication)


PROMOTIONAL ARTICLE

I sourced the content for the article from my contextual research, mainly the 'freegan manifesto' and 'the dumpster diving guide', but I re-wrote it to be relevant. I sourced the image from the internet which I realise could cause copyright infringement issues in a real life design situation and would have to be taken myself or purchased. Had I had the time/decided to produce this piece of design earlier on in the project I would have done this.
I chose to use this as a form of promotion because I think it contextualizes my product as clearly as possible.


I had some fun with InDesign again! And this layout took me a fraction of the time it would have taken me to do at the begining of this module which for me shows my improvement in a very visual way. I know its not perfect, but admittedly it was something I decided to do in the last couple of days. It has meant that I had to spend a lot of time diving in ang out of the digital dungeon trying to print it (only because I wanted it to look real!) and obviously trying to redesign and reprint my promotion board. BUT I DID IT! And I'm glad I did. I feel like the project is more complete with the adition of this article and the other magazine layout, and in my opinion I feel that these two layouts are my strongest pieces of design within this module/project!


Sunday 21 November 2010

Saturday 20 November 2010

Friday 19 November 2010

MY OWN PROMOTIONAL MAGAZINE LAYOUT

I have designed a 5 column grid to house the layout for my redesign of the Stylist layout. Although I am re-using some of the content and layout from the original layout, I think having to lay it out from scratch is a really good exercise for me. This idea came out of me really enjoying the designing for my boards and really getting to grips with the software. I LOVE indesign now. I love the flexibility it gives you in terms of arranging the images and adjusting the sizes before you have to commit to the final design and resize them. The ablility to link the files and then package them makes the whole process so much easier. I love working to a structure like a grid beacause I hate it when things arent alined (I know you can add rulers in the other pieces of software but grids are much simpler). I also love the flexibility with typography that InDesign offers for example altering the kerning and degree of slant.


experiment with dotted line (1)
experiment with dotted line (2)
I think the layout really works well because of the fact that you dont really notice the product straight away : this was my intention. I wanted it to look real, and in a magazine like this with a page of products the viewer is required to browse rather than be guided from element to element. The one subtle grabber is the 'editors choice' stamp that I photoshopped onto my product. The orange circle does grasp the viewers attention but not aggresively. I place the image in the central row deliberately as I wanted to be amongst the other images.


MAGAZINE LAYOUT EXPERIMENT

I wanted to try and contextualize my product and a one way of doing this would be to place it in the kind of situation where it would be viewed by the target audience. I thought of the kind of magazines that my target audience would read, and I think the perfect scenario would be the kind of magazines that are supplementary to a newspaper. A fashion magazine like Vogue or Elle might be too young or would only target a selection of my target audience, where as this kind of publication is the sort of thing that contains lots of gift ideas and various 'home-making' or luxury products. I chose to work with Stylist magazine which is a free magazine distributed widely, not simply because it's free (like the supplements) but because I love the layout and design of the magazine. Also, it does tick all the boxes in terms of content and target audience. Initially I simply photoshopped my product onto a scan of a double page spread:

I am pleased with the results of this experiment, although I think I need to design a layout for myself to make this idea more credible. Also I would like to print out my final design to make it seem more realistic.


I think that the type face they have used here and use throughout the publication is futura, which is a font that I have used for my product design already. 


I wrote my own blurb for the product including a tag line to make it more realistic:


I photoshopped the 'editors choice' stamp onto my product to make it look more realistic and to attract the eye of the reader.

MEMORY STICK DRAMA

WHAT A DAY!! :( Last night I finished my final board designs on InDesign ready for print today at 3pm, only to find that when I tried to open the file this morning it was corrupted and would not open. After no avail I asked the bubble and they had no solution and thought that it could be to do with working from files saved to my desktop or a communication error between the computer and my memory stick. I remained calm - thank god I'd come in at 8am! - and redid them as best I could taking into account all the advice from the bubble. Luckily I had taken screen shots throughout the design process so I could refer to them. I couldn't believe it when around 11am this happened again. At this point I began to worry that I wouldn't be ready for print at 3pm. By this point I was less phased about redoing the boards - I was getting quicker each time at least! So finally finished them with barely a minute to spare... I was annoyed because they weren't perfect, but at least they were done! I took the files to print only to find THE SAME PROBLEM OCCURRED! Thankfully I had left the file open in the studio so I was able to copy and paste the layouts into illustrator and save them. These all opened BAR ONE! James in digital print informed me that the particular type of memory stick I had been using, which I bought from the library only the day before, had to be recalled last year because they caused all kinds of issues. I have tested his theory by using his memory stick to transfer my files, and sure enough, no issues what so ever. I am aware that this is not the fault of the library, but I am going to let them know the issues I have encountered because I wouldn't wish them on anyone else! Thankfully I allowed an excessive amount of time to finish my boards so I was able to get them completed for the deadline, but I day to these issues and it could have been a lot worse. On the up side, I could look at it as an exercise in improving my indesign skills!

Thursday 18 November 2010

DEVELOPMENT OF BOARD DESIGNS

I have formulated a 9 column grid to crete the layout for my packaging board.  I have really been getting to grips with indesign and working with grids.I feel that until now I had not used it to its full potential.


I wanted to re-arrange this board so that there is more of a sense of hierarchy within the layout. Before all the product images were the same size and spaced out equally across the page (see previous design). I liked the way that there were multiple views of the product but it was too much to take in. This is my latest idea :
In this instance your eye is taken first to the main product image and then along at all the smaller images. As this board is A2, I can afford to make these images much smaller than they were originally.


Point of sale board re-designed landscape:
I think that these images work much better on a landscape layout.
Experimentation with product images:
I have included this grey box to make the images stand out better and make it look less clinical and to add some continuity between the boards as I haven't designed a very versatile brand identity. I have added a dotted border to the box to soften it and make it more visually friendly which I think suits the tone of voice of the product better.

A2 BOARD RE-DESIGNS


One of the main issues with my boards which came to light in the crit was the fact that I had designed them as portrait layout when in fact most of my images suited a landscape layout. 

Here are my new landscape boards:


FEEDBACK FROM FINAL CRIT


Wednesday 17 November 2010

LIFE SIZED CUT-OUT PDF


Specification for printers based on my research...


Dimensions : 24" x 72"


Stock : Foamboard
see post on context blog for justification of this decision.


Print processes : Digital UV printing directly onto foamboard


Finishing : Computer aided cutting processrouter cutting (see linked video)


Cost : £48 per board


Assembly : On shop floor


Stand : Included in cost


I have found that all the printing companies I have investigated that print life size cut-out boards offer either square or contour cut as the finishing process, so it would not be necesary to submit any net design (as I previously thought) or any other direction in this area other than choosing between these two options when sending files for print unless you needed something particular. Also, in terms of a stand, this is something that would automatically come with the board if specified in the initial discussion with the printing company, you would not have to design your own.


FIRST BOARD DESIGNS FOR FINAL CRIT